DIY Security Camera Installation Tips : A Step-by-Step Guide
Installing a security camera system yourself can be a rewarding and cost-effective way to enhance your home’s safety. With the rise of wireless technology and user-friendly devices, DIY security camera installation has become more accessible than ever. Whether you’re a tech-savvy homeowner or a beginner, this guide will walk you through the process, providing tips and tricks to ensure a smooth and successful installation. Lets learn more about DIY Security Camera Installation Tips.
Why Choose DIY Security Camera Installation?
- Cost Savings: Avoid professional installation fees.
- Flexibility: Customize the placement and setup to suit your needs.
- Convenience: Install cameras at your own pace and schedule.
- Learning Opportunity: Gain hands-on experience with home security technology.
Tools and Equipment You’ll Need
Before you begin, gather the necessary tools and equipment:
- Security cameras (wireless or wired)
- Drill and drill bits
- Screws and anchors
- Screwdriver
- Ladder
- Measuring tape
- Power drill (if using wired cameras)
- Network video recorder (NVR) or digital video recorder (DVR) for wired systems
- Smartphone or computer for setup and monitoring
Step-by-Step DIY Security Camera Installation Guide
1. Plan Your Camera Placement
- Identify Key Areas: Focus on entry points like doors, windows, garages, and driveways.
- Consider Coverage: Ensure cameras cover high-traffic areas and blind spots.
- Check Wi-Fi Signal: For wireless cameras, test the Wi-Fi strength at each location.
- Avoid Obstructions: Place cameras away from trees, walls, or other objects that could block the view.
2. Choose the Right Cameras
- Wireless Cameras: Easy to install and ideal for most DIY setups.
- Wired Cameras: Require more effort but offer reliable performance.
- Outdoor vs. Indoor: Ensure outdoor cameras are weatherproof (IP65 or higher rating).
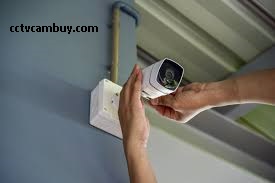
3. Mount the Cameras
- Mark the Spots: Use a pencil to mark where you’ll drill holes for mounting.
- Drill Holes: Use a drill to create holes for screws and anchors.
- Secure the Mount: Attach the camera mount to the wall or ceiling using screws.
- Attach the Camera: Fix the camera to the mount and adjust the angle for optimal coverage.
4. Set Up Power and Connectivity
- Wireless Cameras: Insert batteries or connect to a power source if required.
- Wired Cameras: Run cables from the camera to the power source and NVR/DVR.
- Connect to Wi-Fi: Follow the manufacturer’s instructions to connect wireless cameras to your Wi-Fi network.
5. Configure the System
- Download the App: Most security cameras come with a companion app for setup and monitoring.
- Create an Account: Register for an account to access the camera’s features.
- Pair the Cameras: Use the app to sync the cameras with your smartphone or computer.
- Adjust Settings: Customize motion detection, alerts, and recording preferences.
6. Test the System
- Check Video Quality: Ensure the camera provides clear footage.
- Test Motion Detection: Walk around the monitored area to confirm alerts are working.
- Verify Night Vision: Test the camera’s performance in low-light conditions.
Tips for a Successful DIY Installation
- Read the Manual: Familiarize yourself with the camera’s features and installation instructions.
- Use a Buddy: Have someone assist you, especially when working on ladders or hard-to-reach areas.
- Label Cables: If using wired cameras, label cables for easy identification during setup.
- Secure Wi-Fi: Use a strong, unique password for your Wi-Fi network to prevent unauthorized access.
- Regular Maintenance: Clean camera lenses, check batteries, and update firmware regularly.
Common Mistakes to Avoid
- Poor Placement: Avoid placing cameras too high or in areas with obstructions.
- Ignoring Weatherproofing: Ensure outdoor cameras are rated for weather resistance.
- Overlooking Lighting: Install cameras in well-lit areas or use models with built-in night vision.
- Skipping Testing: Always test the system before relying on it for security.
- Neglecting Storage: Choose a reliable storage solution, such as cloud storage or a local hard drive.
Recommended DIY Security Cameras
Here are some user-friendly options for DIY installation:
- Arlo Pro 5S: Wireless, easy to install, and packed with advanced features.
- Ring Spotlight Cam: Great for deterring intruders with its built-in spotlight.
- Google Nest Cam (Battery): Seamless integration with Google smart home devices.
- Eufy Security SoloCam S340: Solar-powered and subscription-free.
- Blink Outdoor 4: Affordable and easy to set up.
Conclusion
DIY security camera installation is a practical and empowering way to protect your home. By following this guide, you can confidently set up a system that meets your security needs. Remember to plan carefully, choose the right equipment, and test your system thoroughly. With the right approach, you’ll have a reliable security camera system that provides peace of mind for years to come.
Thanks for sharing your perspective on this!
I found this article really informative—thanks!
I really appreciate the practical advice you’ve offered here.