If you have a Hikvision NVR and want to connect an IP camera, this guide is for you. We will explain the steps in a simple way. You do not need special skills to set up your system. Just follow the instructions carefully.
What is a Hikvision NVR?
Hikvision NVR stands for Network Video Recorder. It is a device used to record videos from IP cameras. The NVR stores the video files and lets you watch live streams. It is a central part of a security camera system.
What is an IP Camera?
An IP camera is a type of digital video camera. It sends video data over the internet or local network. Unlike old cameras, IP cameras do not need wires directly to the NVR. They connect through the network.
Why Use Hikvision NVR With IP Cameras?
- You can connect many cameras to one NVR.
- The video quality is usually good.
- You can watch videos live or later.
- The system is easy to expand with more cameras.

Credit: www.youtube.com
What You Need Before Starting
- Hikvision NVR device
- IP cameras (Hikvision or compatible brands)
- Network cables (Ethernet cables)
- A router or switch for network connection
- A monitor or TV connected to the NVR
- A computer or smartphone for remote access (optional)
Step 1: Connect Your Devices
First, connect the IP cameras to your network. Use Ethernet cables to connect each camera to the router or network switch. Then, connect the Hikvision NVR to the same network with another Ethernet cable.
Connect your monitor or TV to the NVR using HDMI or VGA cables. Also, plug in the power supply for the NVR and cameras. Turn on all devices.
Step 2: Access the NVR Menu
After turning on the NVR, you will see the home screen on your monitor. Use the mouse or remote control to open the main menu. If you do not see the menu, press the right button on the mouse or remote.
Step 3: Check Network Settings
Go to the “Network” settings in the NVR menu. Here, you can check the IP address of the NVR. It should be in the same network range as your IP cameras.
For example, if your cameras have IP addresses like 192.168.1.x, the NVR should also have an IP like 192.168.1.y. Make sure subnet mask and gateway are correct.
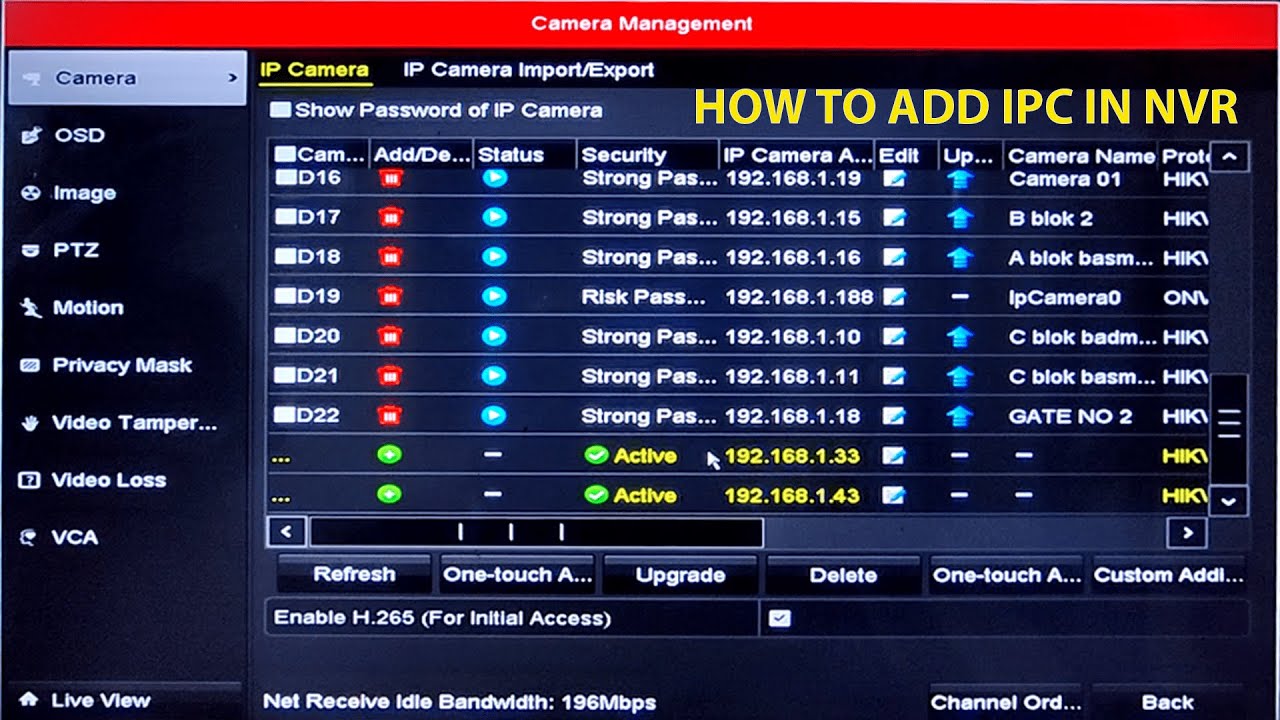
Step 4: Add IP Cameras to the NVR
Go to the “Camera” or “Device Management” section in the NVR menu. Click on “Add” or “Search” to find IP cameras on the network.
The NVR will show a list of available cameras. Select the cameras you want to add. Make sure the cameras have usernames and passwords set. Use the default ones if you have not changed them.
After selecting cameras, click “Add” or “Save”. The NVR will connect to the cameras and show live video on the screen.
Step 5: Set Camera IP Addresses (Optional)
If the cameras do not appear in the list, you may need to set their IP addresses manually. You can use the Hikvision tool called “SADP” on your computer to find and change camera IPs.
Open SADP and find your cameras. Change their IP addresses to fit your network. Then try adding them to the NVR again.
Step 6: Configure Recording Settings
Go to the “Record” or “Storage” settings on the NVR. Choose the hard drive where videos will be saved. You can set the recording mode:
- Continuous recording
- Motion detection recording
- Scheduled recording
Continuous recording saves video all the time. Motion detection saves space by recording only when there is movement. Scheduled recording lets you choose specific times for recording.
Step 7: Test Your System
After setting up, check each camera’s video feed. Make sure the video is clear and stable. Test the recording by moving in front of cameras (if using motion detection).
Play back recorded video to see if it works properly. Fix any problems by checking cables, network, or settings.
Credit: www.youtube.com
Step 8: Set Up Remote Access (Optional)
You can watch your cameras from anywhere using a smartphone or computer. To do this, set up remote access on your NVR.
Go to “Network” and then “Platform Access” or “EZVIZ” settings. Enable the service and follow instructions to create an account. You will use an app like Hik-Connect to view cameras remotely.
Make sure your router allows remote access by opening necessary ports or using P2P technology.
Tips to Remember
- Use strong passwords for your cameras and NVR.
- Keep your devices updated with the latest firmware.
- Label cameras to know which one is which.
- Check cables and connections regularly.
- Use good quality Ethernet cables for stable connection.
Common Problems and Solutions
| Problem | Possible Cause | Solution |
|---|---|---|
| Camera not found by NVR | IP address mismatch or camera off | Check camera IP and power supply |
| No video on NVR screen | Wrong cable or loose connection | Check cables and reconnect |
| Remote access not working | Router blocking ports or incorrect settings | Check router settings and enable P2P |
| Recording not saving | Hard drive full or not detected | Format hard drive or replace it |
Frequently Asked Questions
How Do I Connect An Ip Camera To Hikvision Nvr?
Use the NVR interface to add the IP camera via its IP address and login credentials.
Can I Use Different Brands Of Ip Cameras With Hikvision Nvr?
Yes, most ONVIF-compatible IP cameras work well with Hikvision NVRs.
What Is The Default Ip Address For Hikvision Nvr?
The default IP is usually 192. 168. 1. 64 for most Hikvision NVR models.
How To Find The Ip Camera’s Ip Address Quickly?
Use the Hikvision SADP tool or check your router’s connected devices list.
Conclusion
Setting up Hikvision NVR with IP cameras is simple. Connect devices, add cameras, and configure settings step by step. Use easy network settings and check all connections.
With this setup, you can watch live video and save recordings. You can also see your cameras from anywhere with remote access. Remember to keep your system updated and secure.
Now, your security system is ready. Take your time and follow the steps carefully. Soon, you will have a working Hikvision NVR and IP camera system.