Security Camera Installation Process and Buying Guide
How to Install a Wifi Security Camera Step by Step : Easy Guide
WiFi security cameras are very helpful. They keep your home safe. You can see what is happening anytime. Installing them is easy. Follow these steps.
Step 1: Choose Your Camera
First, pick a camera. There are many types. Some are big. Some are small. Think about where you want to place it. Do you want it inside or outside? Also, check the features. Some cameras can see in the dark. Others can move around.
Step 2: Find a Good Spot
Next, find a good spot. This is very important. You want to see everything. Think about high places. Corners work well too. Make sure it covers doors and windows. Also, make sure it is near a power source.
Step 3: Gather Your Tools
Now, get your tools ready. You will need a drill. Also, a screwdriver. Some cameras need more tools. Check the manual. Make sure you have everything.
Step 4: Install the Mounting Bracket
Now it’s time to install the bracket. Use the drill for holes. Put the screws in. Make sure it is tight. Your camera will hang here. It must be strong.
Step 5: Attach the Camera
Next, attach the camera. Put it on the bracket. Tighten any screws. Make sure it does not move. Adjust the angle. You want a good view.
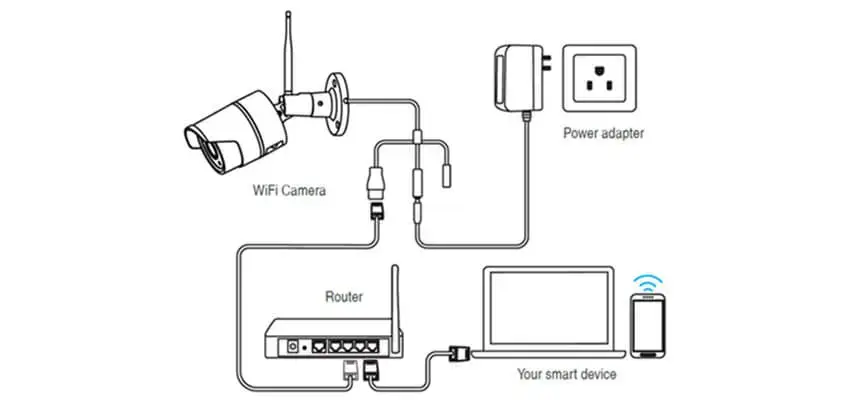
Step 6: Connect to Power
Now, connect the camera to power. Some cameras use batteries. Others need a plug. Make sure it is powered. Check the lights. They show if it is working.
Credit: blog.zositech.com
Step 7: Connect to WiFi
Next, connect to WiFi. This is very important. Use your phone or computer. Open the app for your camera. It will guide you. Enter your WiFi details. Wait a few seconds. Now your camera is online.
Step 8: Test the Camera
Now, test the camera. Look at the video feed. Is it clear? Can you see everything? Move in front of the camera. Check if it follows you. Make sure it sends alerts. You want to know if something happens.
Credit: www.amazon.com
Step 9: Adjust Settings
Now, adjust the settings. Use the app. Change the alert settings. Set up the recording times. Adjust the video quality. Make sure it works how you want.
Step 10: Secure Your Camera
Finally, secure your camera. Make sure it is safe. Check the screws. Make sure they are tight. Look at the wires. They should be hidden. This keeps them safe.
Frequently Asked Questions
What Tools Are Needed To Install A Wifi Security Camera?
You’ll need a screwdriver, drill, and a stable internet connection.
How Do I Connect A Security Camera To Wifi?
Access the camera’s app, choose WiFi settings, and enter your network details.
Where Should I Place My Wifi Security Camera?
Install it in areas with clear views and minimal obstructions.
Do I Need A Power Source For My Security Camera?
Yes, most cameras require a power outlet or batteries.
Conclusion
Installing a WiFi security camera is easy. Just follow these steps. Choose a good camera. Find a good spot. Gather your tools. Install the bracket. Attach the camera. Connect to power. Connect to WiFi. Test the camera. Adjust settings. Secure your camera. Now you can keep your home safe.
Step
Action
1
Choose Your Camera
2
Find a Good Spot
3
Gather Your Tools
4
Install the Mounting Bracket
5
Attach the Camera
6
Connect to Power
7
Connect to WiFi
8
Test the Camera
9
Adjust Settings
10
Secure Your Camera
Now you know how to install a WiFi security camera. Follow each step. Your home will be safer. You can relax. You can check your home anytime. This is very useful. Happy installing!